Saturday, May 31, 2008

New Direction In Mid-Stream

This entry starts with yesterdays events. I started to re-work the left rear flank of the woman's horse in Down From The High Lonesome. I found that the structure of the muscle mass was to massive. I took a knife to it and carved it down. then I started to shape the flank with my wire tool. At the end of the day, I had it where I wanted. Muscles are more defined and proper size.


Last night in a conversation the owner of the James Harold Gallery in Tahoe City California, we discussed the fact that it's been requested that I create a Cowboy piece. To be specific a bronc buster piece. Since I'm going to be showing at his gallery over the 4th of July, I felt I should at least start the piece. Below you'll see the base for the cowboy piece, and of course the anatomical drawing of a horse the size of the piece I'm going to do. I'm using an old roll of Duck Tape for a raised part of the base. I want to have the horse and cowboy on a round, raised base. (To see a detailed description of how I make the horses armature, check the bolg entries (6 parts) for March 15th 2008 )


I've shaped the armature of the horse to conform to the horses position in his flight from his violent flight from the ground in an attempt to throw the cowboy. I've placed the wire end of the left foot is placed inside the hole of the roll of Duck Tap. I then give the armature support by inserting and attaching a wooden dowel. I then sprayed foam into the donut hole of the tape. Now I just let it sit overnight to let the foam set up.


Thursday, May 29, 2008

Down from the High Lonesome (p16) Still Working on the Base

This base is turning into a career all it's own. The foam had finally set up to where I could finally carve it. Photos below shows this exciting procedure.


I had to let the clay soften for an hour or two. I had wax under the lamp because I was going to work on the figures yesterday and forgot to change out to the clay. When it finally softened, I started covering the foam. The base is taking shape.


Tomorrow I move onto the horses. I'll be removing the figures, because I'm planning on redoing them.

Wednesday, May 28, 2008

Down from the High Lonesome (p15) Working on the Base Continued

The collection of photo's below show the clay as it was yesterday, and then after I built the reservoir for the canned spray foam, out of duct tape. Once sprayed the foam inside the reservoir I let it sit over night to set up. You can see in the final two photo's the foam once the tape has been removed.

Now a video for entertainment and edification...


More tomorrow..

Tuesday, May 27, 2008

Down from the High Lonesome (p15) Working on the Base

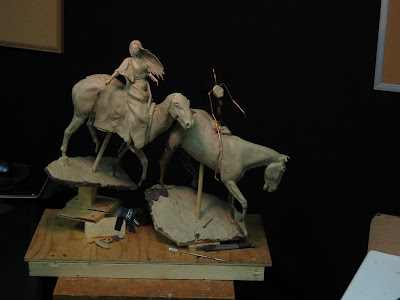
I am back on Down from the High Lonesome. About a month ago I stopped working on this clay. I'm taking a new approach. I unfortunately only have one photograph from today. The video I shot with my web cam, hooked up to the to the studio computer, with Vista Windows. I just found out, I can't copy the videos onto a memory disk, and have them run on my XP Windows computer at home. I'm not a real fan of Vista. So until tomorrow I can't show you the foam. Or how I set up to do the foam. This is the only photo I had. This is the condition the clay was in this morning when I started.


Tomorrow I'll be catching you up on how I've prepared the clay today. As you can see in the photograph above, the front horses ears are damaged. This happened in transport back from Palm Desert. Check back in tomorrow evening for more.

Monday, May 26, 2008

My Studio


I've been asked what does my studio look like? Is it in your home?
Well the picture above is my humble Studio. I see so many artists studios that look so much better than mine. They have great windows with wonderful views. I'm content with mine. It's comfortable to me. I use a black cloth as my backdrop because it helps me focus on the clay I'm working on.

I have a laptop as an essential tool. I have all my research material on it and on a back up hard drive.


My lighting system is home made. It ain't pretty, but it works for me. I use a sculpting stand that I purchased from Sculpture House in Ny, Ny. You can't see it cus I'm in front of it.


I have a small flat screen TV/DVD Player (all in one). Another essential. I shoot video at modeling sessions, and burn DVD's. I can view them on the monitor. Also, it's good for entertainment while I work. (28 Dresses is playing on it in the photo)


A cutting board is the best thing to roll clay on. I also have a Pasta machine for rolling clay flat and making fringe.
This photo shows the web cam I have in studio. I will sometimes shoot a video for my blog, using this item.
Well that's it. I'm sure if your an artist, you have your own little area where you can create.
I chose to rent a garage space a couple of miles from my home to set up my studio in. Getting away from home makes going to the studio feel more professional. When I go home, I leave the artwork behind, and just relax. I have to, so I can start fresh the next day. By the way, my studio is never this organized. Just spent a few days re-doing the layout of my studio. I do this a couple of times a year. Makes everything fresh and new.

Wednesday, May 21, 2008

War Medicine - The Hilt Of The Matter

Before I get started on today's entry, just wanted to share a little spring with you. Finally the crab apple blossoms are popping out. Like every Montana spring I've been through, it's supposed to snow tonight.


The following photo's are from different model shoots. Using models, especially authentic models, can be very expensive, but value wise, you can make it back off of that first piece you do from the session. I used several shoots for clothing and headdress for this piece. I placed my name across the photo to protect the images.


The photo below shows the sword and the wax copy of the sword. I use Crystalline Wax that I purchase from the foundry. When heated under a 100 watt bulb, it softens and is like clay to work with. Here you see how I'm trying to match the hilt.


Here are photo's of the clay at the end of the day today.

Tuesday, May 20, 2008

War Medicine - Feathers

War Medicine is a clay that I've had sitting in my studio in limbo for several months. I took it to a couple of shows since January of this year, but haven't worked on it much. Today I'm preparing it for the shows I'm going to be doing this summer.


Photo below shows the piece as I started today. The sword on the wall behind it is a replica Union Civil War Sword, that I'm including in the warrior's hand. It's scabbard is held with his shield. He wears a Union Calvary Jacket with the sleeves torn off.
I'll be reworking the feathers on the hanging cloth on the shield. They were badly damaged over the last few months of transport and sitting.
I was going to rework them in wax, but decided to change the type of Eagle Feather and therefore the length of the feathers will be smaller than the feathers I had. I'm holding the damaged feathers.


I take the feathers I already had, and cut them down, reshaped, and textured them. I make the quill by rolling clay into a very thin and progressively narrowing line. I use a paint mixers stick to do this. It takes a lot of practice to do it with your hand. If you use this stick, that you can get at any paint store, it controls the clay a lot better. You need to learn to control the pressure. Once the quill is finished you center it, and lightly press it down to attach it.


The photo's show how I try and make it look more like a real feather by adding breaks in the barb veins of the feather. I use an hobby Knife to do this with.

Feather attached and 8 more to go. Here is the photo of the clay at the end of the day. Still much more to do.


As you can see from this blog, I work on more that one piece at a time. This is a good thing. It keeps the vision fresh, when it starts to get dry.

Friday, May 16, 2008

Coloring Cheyenne Courtship

Just less than 2 months after delivering the clay of Cheyenne Courtship to Northwest Art Castings in Bozeman (check 03-26-2008's entry on this blog), I head to the foundry to color the first finished bronze copy of this piece. May 15, 2008, 9 am.


Below are photos of the naked bronze. Sandblasted and ready for coloring. Bronze is white colored. When polished, you get a brass look.

First thing we do with the raw bronze is set up the canvas, so to speak, for the colors that the acid and chemicals will produce on the surface. Isac is shown spraying the chemical Potash, known by most people as Liver of Sulfur. this gradually colors the cold bronze black. Where colors, such as, skin tones are applied, the black needs to be rubbed off. Isaac rubs back the black color back down to the bronze with a Brillo. Video below the photo's shows this as well.


Isaac now starts to apply Titanium Dioxide to the heated up bronze. This gives the bronze a white finish. It's kind of like an artist who starts with a white canvas. The white finish will be the base color for all the colors that will now be added.


Detail painted areas are now added.


The following is a collection of videos shot over the 8 hours it took to color this bronze. Issac Lowe is the Patina Artist. In real life he's an artist as well. You'll see Lance Dubois doing a little metal grinding on the lower part of the ladies dress. We found a blemish that needed to be corrected. Sometime you don't see problems till you start coloring the bronze. Lance assembled all the many pieces and parts of this bronze. He's a master welder and metal worker. Without people like Lance, Isaac, and ladies like Ashley who worked on the waxes, bronzes like this would never be produced. Hope you enjoy this 3 minute video.

Finaly, here are a few photo's of the finished bronze, with base and name plate added, ready to be shipped out to the gallery or client. Less than two months from delevery to the foundry to out the door. That's a great turn around time

I hope this helps you understand the massive amount of work that goes into producing a bronze of this quality. Check my website. http://www.bronzesbylemon.com/ occasionaly. This bronze will be displayed there in the next couple of weeks, along with a discription and demensions. Of course all my bronzes can be purchased. Go to my website if your interested.

Monday, May 12, 2008

Cowboy Hat to Boots

Well today was a day I've looked forward to for a very long time. It was a day to color (Patina) the life size cowboy piece, "Working for the Brand". Bronze is any of a broad range of copper alloys, usually with tin as the main additive, but sometimes with other elements such as phosphorus, manganese, aluminium, or silicon. It was particularly significant in antiquity, giving its name to the Bronze Age. "Bronze," in turn, is perhaps ultimately taken from the Persian word "berenj," meaning "Brass".
Heat and chemicals are used to color bronze. Once I went over the bronze and had a couple of areas smoothed or corrected, it was time to color the bronze using differing acids and chemicals. First the bronze is bathed in a potash solution that turns the metal black. Then the patina lady, Diana, using a Brillo, rubs off the black where the bronze's color will require more bronze showing. Like the face. The scarf around his neck is left black.


The video gives you an idea of the sounds in the foundry, as Diana heats up the bronze and using a spray gun, she applies acid to turn the color of the bronze.


Here are photo's showing how the hat is turning more of a brown color as Diana torches the piece and sprays on the acid.


The following collection of photos shows the colors starting to take shape. Diana polishes the tacks on his vest above the fringe, and the spurs on his boots.

5 hours later, the patina is done. Shown in the photograph from left to right, is, of course, me, Diana and the guy who did the metal work, Erik. there were almost 20 different people who actually worked on this piece to get it to this point.


Here are differing views of this new bronze.

Sunday, May 11, 2008

An Hour and a Half from Home

I made a short trip to Yellowstone Park today. Bought my season pass, and saw tons of wild life. I'm inviting you to join me.
Traveling from Ennis Montana where I live, about 25 miles south on the Madison River, is one of many Buffalo Jumps found in Montana. The photograph on the left are the cliffs that formed this jump. Before the horse, Indians ran herds of Buffalo off of cliffs like these to kill enough Buffalo for the full year.
From the book, Journal of a Trapper, by Osborne Russell (It's an actual Journal. Check link below), there's a passage that tells of a group of mountain men on horseback, led by Jim Bridger, who ride along the top of these cliffs and they spot a Blackfoot Village 3 miles north of here. They ended up battling them. Lot's of history in this valley I live in.


45 miles south is were a mountain fell during the summer of 1959.
At 11:37 p.m., the earthquake struck the Madison River Canyon in southwestern Montana. Tremors were felt as far away as Seattle.
Along the fault lines, the land dropped as much as 20 feet.
The massive face of a mountainside broke away, causing the largest recorded earthquake-triggered landslide in North America.
Ninety million tons of rock and debris roared down the Madison Canyon's north wall. It smothered the valley and surged 400 feet up the opposite side of the canyon.
The landslide buried an area just west of the Forest Service's Rock Creek Campground and blocked the course of the Madison River. It created a natural dam that backed up the water to form Earthquake Lake.
Twenty-eight died as a result of the earthquake, 19 of the bodies were presumed to be buried under the rock.
The photo's below show this tragic slide. The one photo of the two standing massive rocks at the top of the rock surge on the opposite side of the canyon, actually were part of the rock damn that broke and caused the slide. These two rocks surfed on the slides wave of rocks. The dead trees on the ground were some of the trees that died that night in the slide 49 years ago. I've added Google 3D Earth snap shots to show you the elevated views of this tragic slide.


The photo above of the dead trees in the lake were drowned on that night in 1959. I traveled here to this site during the summer of 1960 and they still had their green needles and looked alive. In fact they looked alive for quite a few years after.
Saw this snow bus in West Yellowstone. It's about to be stored for the summer.

I drove 100 miles to Old Faithful Inn. It's next to Old Faithful Geyser. Here is the exterior and interior.


It started raining at Old Faithful, so I didn't stay around to watch it go off. I headed back home.
Here are a few photo's of wild life I took along the way today.


Can you spot the Eagle's nest at the top of this ridge. Click the photo to enlarge it.

This looked like just another rock till it moved.


Lastly but certainly not least, this photo was the best I took all day. It's the symbol survival and of new life and the comming spring and summer. Buffalo survive the winter, but it's very tough. Food is scarce and if they didn't get enough to eat the by fall, they wouldn't make it through the winter in the Park. Drove past a Grizzly feeding on a buffalo that didn't make it. Didn't take a photo of that. Not because I didn't want to. Just to many people on the side of the road to waist my time.


Here is a link to that book, Journal of a Trapper.
http://books.google.com/books?id=S3xmHXId1LMC&dq=journal+of+a+trapper+by+osborn+russell&pg=PP1&ots=UinPCPyYhX&sig=AJ1sV6zIs6d1Oh-tc71PtDyNAJs&hl=en&prev=http://www.google.com/search%3Fhl%3Den%26q%3Djournal%2Bof%2Ba%2Btrapper%2Bby%2Bosborn%2Brussell&sa=X&oi=print&ct=title&cad=one-book-with-thumbnail#PPP1,M1

Saturday, May 10, 2008

Sacagawea - Finishing up the Clay

The following took both today and yesterday to complete. Again, click on the photo's to view larger versions of them.
I'm at the final steps of this clay. I've added beaded necklaces and hairpiece. While doing my research I found that many of the plains Indian Woman wore not only necklaces and hair ornaments, they wore bracelets and rings. Not sure if Sacagawea would have. I'm taking a bit of artistic licence.
I start working on the Deer Doe tail on the front of her dress. Adding fur texture. I heat the tool with a lighter and then while it's warm, work the clay. This lightly melts the clay and allows the tool to move through the clay without having it sticking to the tool.
The last photo in the series below, you can see, I'm using a lighter to melt the surface of the shell ornament in her hair. This shines the clay and gives it a higher polished surface. (If you are a minor, do not do this without your parents supervision)


Next I try and take down the sharp edges of the fur texture I've created. The way I do this, I use lighter fluid on a paintbrush. The lighter fluid melts the clay a little and thus changes the texture. (Again, if you are a minor, do not do this without your parents supervision)


Now I need to smooth the texture of the girls skin. Using a plastic kitchen Brillo, I squirt lighter fluid on it, then on the face. I then start to rub the skin, careful not to overdo it.


Then doing the same using different brushes, I continue to smooth the skin surface.
I use my thumb to smooth it even more.
Now here's where if your a minor, do not do the following at all.
Using a small torch, I melt the surface of the skin. This gives the skin a high gloss. You have to be really carefull doing this. You can hit the skin with to much heat and melt more than you want to.


Below are the final photo's of this clay. Monday, I'll take it to Bozeman to a foundry to get an idea as to how expensive this piece will be to cast into bronze. The cost of production will determine the selling price I ask for the finished bronze of this new piece.


Finally, no one really knows the exact date Sacagawea was born or the exact date she died. Sacagawea's, known history begins at the age of 12 when she was kidnapped by a war party of Hidatsa Indians. This took place 40 miles north of where I live here in Montana.
She was taken from her homeland located in today’s Idaho and Western Montana, to the Hidatsa-Mandan villages near what is know known as Bismarck, North Dakota. There, she was later sold as a slave to Toussaint Charbonneau, a French-Canadian fur trader. In November 1804, the Corps of Discovery arrived at the Hidatsa-Mandan villaage. The corps decided that Sacagawea would could be very important to the expedition becuase of her Shosonne roots. So they hired Sacagawea and her husband Toussaint Charbonneau as translaters. Sacagawea did not speak English, but she spoke Shoshone and Hidatsa. Her husband Charbonneau spoke Hidatsa and French. So the plan was if they met the Shoshones, Sacagawea would talk with them, then translate to Hidatsa for Charbonneau, who would translate to French. Then the Corps’ Francois Labiche would translate the French into English so the captins would understand. Sacagawea turn out to be important not just for her translating. When Indian tribes saw the expedition with a woman and a child they new it was a friendly party not a war party.
Well that's it for now. Check back in next week. I'll be revisiting an earlier clay.

Thursday, May 8, 2008

Foundry Trip Today


Made a run to the foundry today to do a final check on Working for the Brand. It's to be colored on Monday. So any blemishes or problems need to be fixed before next week.
Passed a lot of living and wildlife on the way to Bozeman. I'm driving along and I look over at a little marsh area and something catches my eye. Click on the picture and see if you can see what I saw.

These buffalo are grazing on Ted Turner's Ranch. His ranch is huge. Almost 20 miles of the trip is along his ranches boundary.

On the way home I saw this single Pelican floating on the Madison River. Behind him and to the left you can see fisherman in a river guides boat, lazily fishing the afternoon away. Doing pretty much what the Pelican is doing.

Further down the river, I came across a group of Pelicans just having a social. A Fisherman in the background in waders looks on.

Was sick yesterday... so have some catching up on my clay tomorrow. Had an inspiration for the Down from the High Lonesome piece. So Next week I'll be re-visiting that clay.